Delicious Homemade Sandwich Bread with Tallow
Baking your own bread is one of the best ways to bring warmth and deliciousness into your kitchen. This homemade sandwich bread recipe, enriched with tallow, promises a fluffy loaf with a unique flavor that store-bought bread just can’t match. Whether you’re a seasoned baker or trying your hand at yeast bread for the first time, this guide will walk you through creating the most delicious homemade sandwich bread with tallow.
Jump to RecipeIngredients and Preparation
Main Ingredients
- 6 and 1/4 cups of all purpose flour
- 1/4 cup tallow
- 2 tbsp instant yeast
- 2 tbsp sugar
- 1 tsp salt
- 1 tbsp olive oil
Liquid
- 2 and 1/4 cups of warm water
Optional Toppings
- Olive oil or egg wash, for brushing the loaves
The Baking Process
Yeast Mixture
Begin by mixing 2 tbsp of instant yeast with the warm water in a large bowl. The warmth of the water is crucial to activate the yeast, which is responsible for the rise of the bread.
Combining Ingredients
Gradually mix in 6 1/4 cups of all-purpose flour, sugar, salt, olive oil, and tallow into the yeast mixture. Tallow, a traditional fat, adds a unique richness to the bread. If you prefer, substitute tallow with butter for a different flavor profile or coconut oil for a vegan option.
Kneading the Dough
Once a shaggy dough forms, turn it out onto a lightly floured surface. Knead until you have a very smooth dough ball. This step is vital as it develops gluten, which gives the bread its structure and soft texture.
First Rise
Place the dough back in the mixing bowl, cover it with plastic wrap or a clean tea towel, and let it rise in a warm place for about 15 minutes. This first rise, although shorter than traditional methods, is essential for a fluffy loaf.
Shaping the Loaves
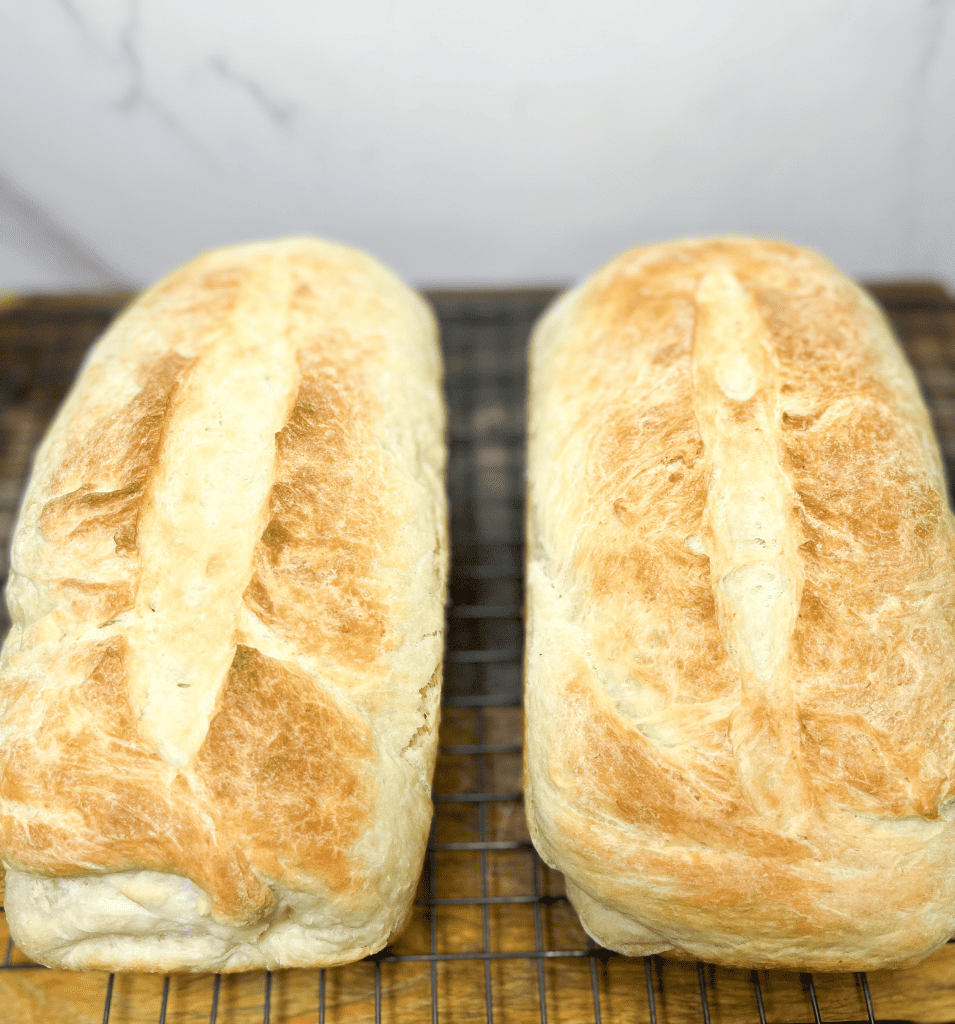
After the dough has risen, divide it in half and shape each half into a loaf. Place each loaf into a standard-sized greased loaf pan. Optionally, drizzle the loaves with olive oil or brush them with an egg wash for a golden-brown crust.
Scoring the Dough
With a sharp knife or razor, make a slit about a quarter-inch deep down the center of each loaf. This allows the bread to expand evenly while baking.
Baking the Bread
Place the loaf pans in an unheated oven with a pan of water underneath. The steam from the water helps create a crisp crust. Heat the oven to 400 degrees and bake for 35 minutes, or until the top of the pan reaches a golden brown color.
Cooling
Remove the bread from the oven and let it cool on a cooling rack for at least 10-15 minutes before slicing. This helps the bread to set and makes slicing easier.

Storing and Enjoying Your Bread
Storing
Once completely cooled, store the bread in an airtight container or plastic bag at room temperature for up to 3-4 days. For later use, you can slice the bread and freeze it in a freezer-safe bag.
Enjoying
This homemade sandwich bread is versatile. Enjoy it with honey butter, make sandwiches, or toast it for breakfast. The rich flavor of the tallow gives it a unique edge over regular bread. This is a perfect bread to pair with homemade pimento and cheese!
Variations and Tips
Whole Wheat Option
For a healthier twist, substitute half of the all-purpose flour with whole wheat flour. This will add more dietary fiber to your bread.
Dough Enhancers
For an even softer texture, consider adding a tablespoon of dough enhancer or substitute a quarter cup of the water with whole milk.
Kneading
For those with a stand mixer, use the dough hook attachment and knead the dough on medium speed. This can save a lot of time and effort, especially when making multiple batches.
Adding Flavors
Feel free to experiment with adding herbs like rosemary or thyme, or sweeteners like maple syrup for different flavor profiles.
Why Make Your Own Bread?
Baking your own bread can be a rewarding experience. Not only does it fill your home with a delightful aroma, but it also allows you to control the quality of ingredients used. Plus, there’s something incredibly satisfying about enjoying bread that you’ve made from scratch.
Conclusion
This delicious homemade sandwich bread recipe with tallow is more than just a recipe; it’s a journey into the art of bread-making. Whether you’re using a bread machine, a food processor, or your hands, the result is a wonderfully fluffy and flavorful loaf that’s perfect for any occasion. So, the next time you’re in the mood for baking, give this recipe a try. The simplicity of the ingredients, combined with the unique addition of tallow, makes for an amazing recipe that’s sure to impress.

Delicious Homemade Sandwich Bread with Tallow
Equipment
- 1 large mixing bowl
- 1 wooden spoon
- 2 standard loaf pans
Ingredients
- 6 1/4 cups all purpose flour
- 2 1/4 cup warm water
- 1/4 cup tallow
- 2 tbsp instant yeast
- 2 tbsp sugar
- 1 tsp salt
- 1 tbsp olive oil
Instructions
- Begin by mixing 2 tbsp of instant yeast with the warm water in a large bowl.
- Gradually mix in 6 1/4 cups of all-purpose flour, sugar, salt, olive oil, and tallow into the yeast mixture.
- Once a shaggy dough forms, turn it out onto a lightly floured surface. Knead until you have a very smooth dough ball.
- Place the dough back in the mixing bowl, cover it with plastic wrap or a clean tea towel, and let it rise in a warm place for about 15 minutes.
- After the dough has risen, divide it in half and shape each half into a loaf.
- Place each loaf into a standard-sized greased loaf pan.
- Optionally, drizzle the loaves with olive oil or brush them with an egg wash for a golden-brown crust.
- With a sharp knife or razor, make a slit about a quarter-inch deep down the center of each loaf.
- Place the loaf pans in an unheated oven with a pan of water underneath.
- Heat the oven to 400 degrees and bake for 35 minutes, or until the top of the pan reaches a golden brown color.
- Remove the bread from the oven and let it cool on a cooling rack for at least 10-15 minutes before slicing.
- Once completely cooled, store the bread in an airtight container or plastic bag at room temperature for up to 3-4 days. For later use, you can slice the bread and freeze it in a freezer-safe bag.


So you only do the one 15 minute rise then put them in the cold oven while it preheats as the 2nd rise?
Yes and it works out perfectly.
Recipe looks dope but man is there some easy way to halve it? 6 cups of flower is a heavy commitment I don’t need 2 loafs
Absolutely! Just half it and make one loaf.