
Homemade Dish Soap with Simple Ingredients
If you’ve been looking for a way to reduce plastic waste in your home while keeping your kitchen sink stocked with effective cleaning products, making your own homemade dish soap is a great place to start. With a few simple ingredients and the right dish soap recipe, you can make a solid dish soap bar that works just as well—if not better—than commercial dish soaps from the grocery store.
Not only will this homemade version save you money, but it also gives you control over the natural ingredients you’re putting on your dishes and your skin. Many commercial dish soaps contain harsh chemicals like lauryl sulfate, which can irritate dry skin and leave soap scum behind. By making your own dish soap, you’ll have a zero-waste dish soap bar that’s tough on greasy dishes yet gentle on your hands.
**This post contains affiliate links. We are a participant in the Amazon Services LLC Associates Program, an affiliate advertising program designed to provide a means for us to earn a small commission by linking to Amazon.com and affiliated websites.
DISCLAIMER
When making homemade soap, safety is the most important part of the process. Working with sodium hydroxide, also called lye, requires extra care because it is a highly caustic substance that can burn skin or damage eyes if it comes into contact with them. That’s why it’s essential to always wear proper protective equipment. Gloves, safety goggles, and long sleeves are a must, and it’s also a good idea to keep vinegar nearby since it can help neutralize small lye spills. Make sure you are working in a well-ventilated space or even outside if possible, as the fumes created when mixing lye with water can be strong. Always keep children and pets out of the room while making soap to avoid accidents.
One of the most important safety rules is to always add the lye to the water, never the other way around. Adding water to lye can cause a violent reaction that’s dangerous to both you and your workspace. Stir slowly and carefully when combining, and allow the lye water to cool down before mixing it with oils. Using stainless steel or heat-safe containers is best since lye can react with certain metals and plastics. Taking these precautions might feel like an extra step, but it ensures that your diy dish soap bar is created safely from start to finish. With careful handling, you can confidently make your own homemade dish soap while protecting yourself at the same time.
Why Choose Homemade Dish Soap?
Eco-friendly
Skip single-use plastic bottles and make a solid dishwashing soap bar instead.
Cost-effective
A homemade dish soap recipe costs less in the long run than buying dishwashing liquid over and over.
Customizable
Add essential oils like lemon essential oil or tea tree for extra cleaning power and fresh scent.
Zero Waste
Using ramekins, bowls, or a soap dish for storage means you can avoid extra cost from packaging.
What You’ll Need for Homemade Dish Soap
- Coconut oil (for cleaning power)
- Castor oil (for a small amount of lather)
- Sodium hydroxide (lye)
- Water (at room temperature)
- Essential oils (optional, citrus oils like lemon or tea tree work great)
- Immersion blender
- Heat-safe bowls, ramekins, or soap dish molds (your local thrift store is a perfect place to get these)
- Safety gear: gloves and goggles
- Wooden handle dish scrubber (optional)
***This is a cold process soap recipe, so be sure to handle sodium hydroxide carefully.
Step-by-Step Instructions for Homemade Dish Soap
Prepare Your Containers
Select ramekins, thrifted bowls, or other heat-safe containers that you’ll use both as molds and as holders for your homemade dish soap. This eliminates the need for plastic bottles and makes it easy to keep the soap right by your kitchen sink. Make sure the containers are clean and dry before starting.
Measure Your Oils
Fill your bowl with water to see how many ounces it holds. Multiply that number by 1.8, then again by 0.4. This will tell you how many ounces of vegetable oils you’ll need.
For this recipe, we’ll use four 8 oz jars, which equals about 23 ounces of oils.
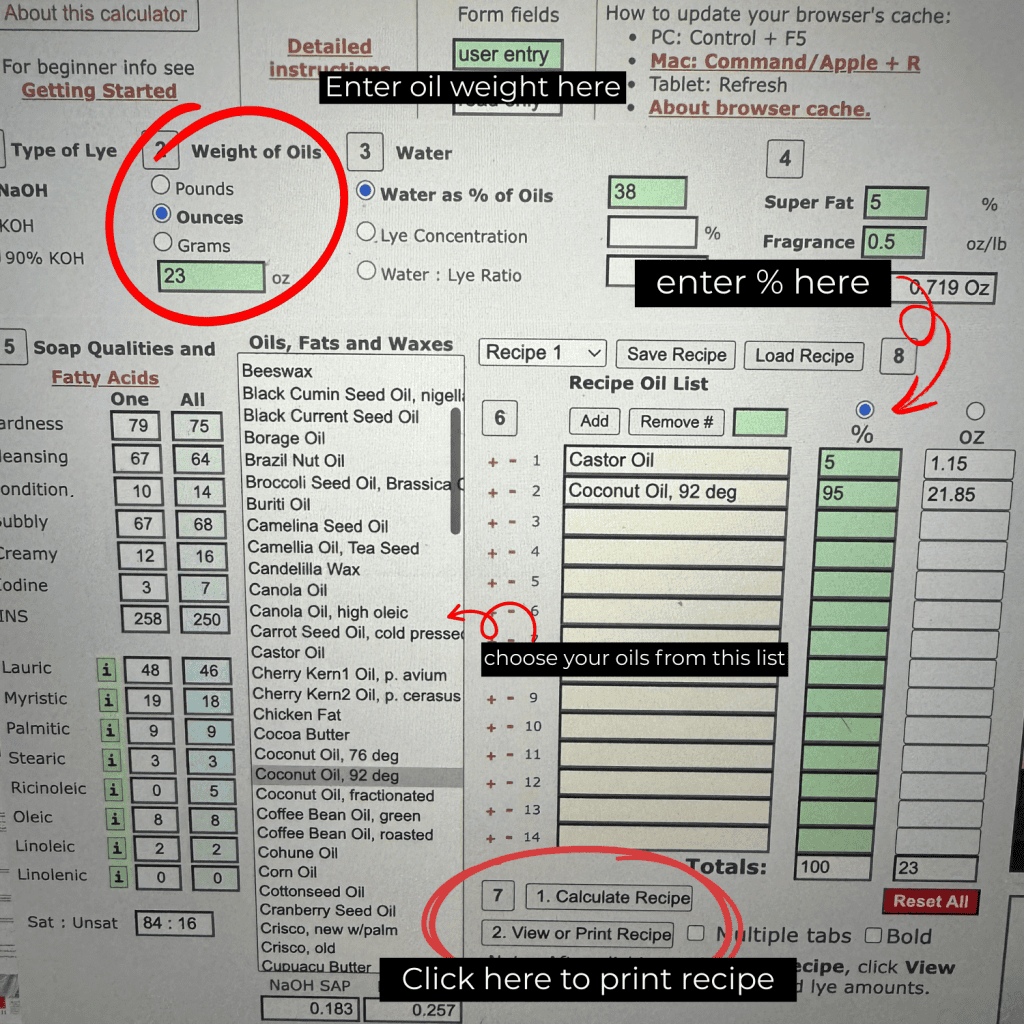
Use a Lye Calculator to Calculate Lye and Oil
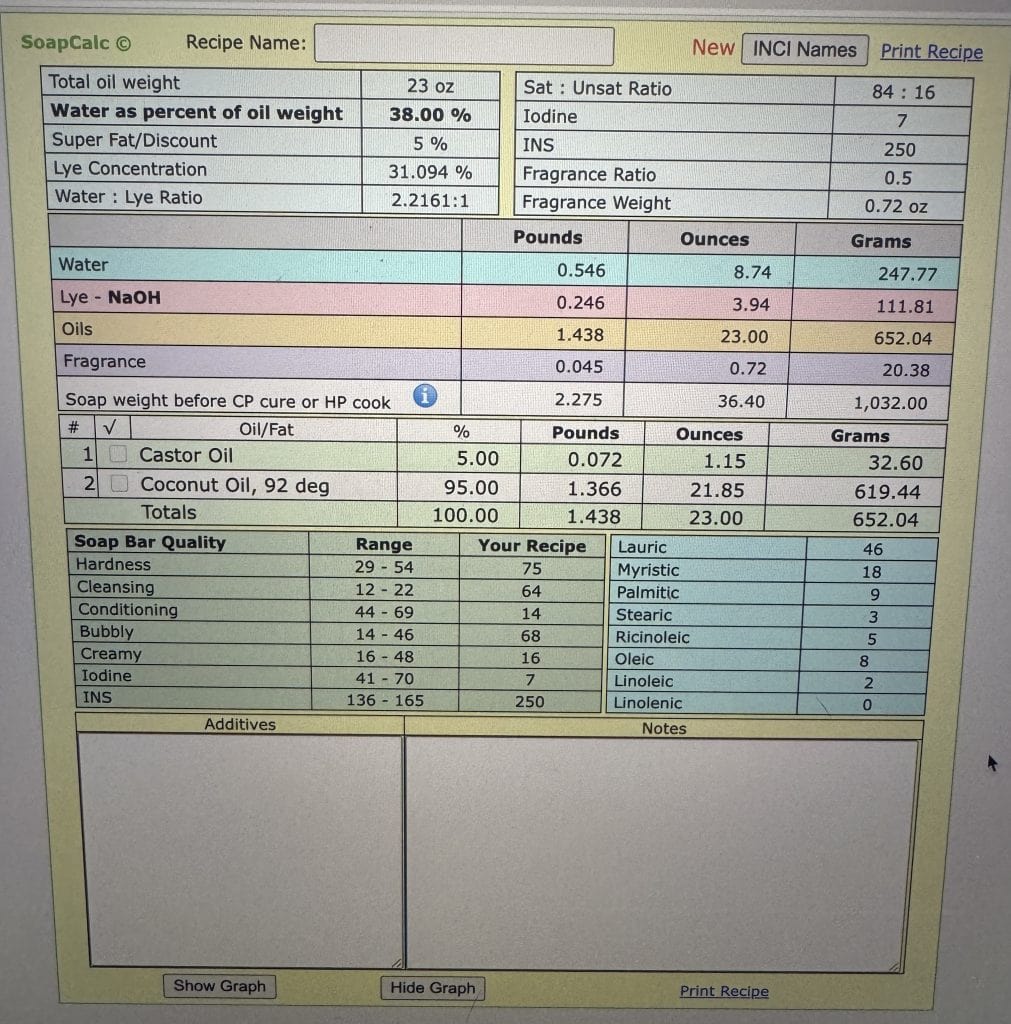
Head over to an online lye calculator and enter 95% coconut oil and 5% castor oil. The calculator will give you the exact amounts of lye, water, and oils. For best results, measure in grams.
These are the measurements for our four 8oz bowls:
- 620 g coconut oil
- 32 g castor oil
- 250 g water
- 110 g sodium hydroxide
Optional: about 20 g of essential oils for fragrance. Lemon essential oil is a natural dish soap favorite.
Melt the Oils
Measure out the 620 grams of coconut oil and place it in a double boiler or stainless steel pot. Heat gently until fully melted, then stir in 32 grams of castor oil. These oils create a solid dish soap with strong cleaning power and just the right amount of lather.
Mix the Lye Solution
In a separate heat-safe bowl, carefully measure 250 grams of water. Slowly add 110 grams of sodium hydroxide (lye) into the water—never add water to lye, as this can cause a dangerous reaction. Stir until the lye is completely dissolved. The mixture, known as lye water, will heat up quickly and release fumes, so always wear gloves and goggles and work in a well-ventilated area. Allow it to start cooling after mixing.
Match Temperatures
Check the temperature of both the melted oils and the lye water. Wait until they are between 105–120°F and within about 10 degrees of each other. This step prevents issues like false trace and ensures your soap mixture blends smoothly.
Blend to Trace
Slowly pour the cooled lye solution into the melted oils. Use an immersion blender in short bursts, stirring between blends, until the mixture reaches trace. At this stage, it will look similar to pudding, and you should be able to see light trails on the surface when you drizzle some of the soap back into the bowl.
Add Fragrance (Optional)
If you’d like a fresh scent, stir in about 20 grams of essential oils at light trace. Lemon essential oil is a classic choice for dish soap because it helps cut through greasy dishes, but you can also try tea tree or other citrus oils. Stir these in by hand rather than blending to keep the mixture smooth.
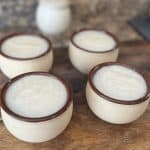
Pour into Ramekins or Bowls
Carefully pour the soap mixture directly into your ramekins or bowls. Tap the containers lightly on the counter to remove any air bubbles.
Let the Soap Set and Cure
Place the containers in a cool, dry area and leave them undisturbed. The soap will harden as it cures, but it needs 4–6 weeks for the water to evaporate and for the bars to become long-lasting and safe to use.
Use Your Dish Soap Bars
After curing, place one bowl of soap by your kitchen sink. To use, simply wet a dish brush or natural sponge and rub it directly onto the soap to create a lather.
Common Issues When Making Homemade Dish Soap
Soda Ash
Soda ash is one of the most common cosmetic issues in cold process soap making. It shows up as a thin, white, powdery film on the surface of your soap bars. While it doesn’t affect the cleaning power of your homemade dish soap, it can make the bars look less appealing. Soda ash happens when unsaponified lye reacts with carbon dioxide in the air, creating a harmless but chalky residue.
How to prevent soda ash:
- After you pour soap into the molds, lightly spritz the surface with 91% isopropyl alcohol. This creates a protective barrier and helps stop soda ash from forming.
- Cover your soap molds with a lid or plastic wrap to limit air exposure during the first 24 hours.
- Make sure your soap reaches a full trace before pouring, as thinly traced soap is more prone to soda ash.
How to fix soda ash if it appears:
- Simply wipe the surface of the soap bar with a damp cloth.
- Use a handheld steamer to gently melt the ash off the surface.
- Shave or plane the top layer of the soap if you want a perfectly smooth finish.
The good news is soda ash is purely cosmetic. Whether you prevent it ahead of time or clean it up after, your soap will still wash dishes just as effectively.
False Trace
False trace can be confusing for beginners because it looks like your soap mixture has reached trace when it actually hasn’t. Trace is when the oils and lye water are fully emulsified and the mixture thickens to a pudding-like consistency. False trace, on the other hand, happens when solid oils (like coconut oil, palm oil, or even butters) start to cool and harden before the lye and oils have truly blended. This can trick you into thinking your soap is ready to pour when it isn’t.
What causes false trace:
- Oils and lye water are too cool when combined.
- High amounts of hard oils like coconut oil or palm oil solidifying quickly.
- Not blending long enough to fully emulsify the mixture.
How to prevent false trace:
- Make sure both your oils and lye water are between 105–120°F and within 10 degrees of each other before mixing.
- Fully melt your hard oils and butters before combining them with the lye solution.
- Use an immersion blender rather than stirring by hand to ensure a consistent blend.
How to fix false trace:
- If you suspect false trace, keep blending with the immersion blender until the mixture becomes smooth and evenly combined.
- Gently reheat the mixture in short bursts if solid oils have begun to harden.
- If you’ve already poured soap that was at false trace, it may separate or fail to set. In that case, you can rebatch the soap by gently melting it down and mixing again until it emulsifies properly.
False trace can be frustrating, but once you learn to recognize the difference between a true trace and oils just starting to solidify, it becomes much easier to avoid.
Seizing
Seizing happens when your soap batter thickens so suddenly that it becomes almost solid before you can pour it into the molds. Instead of a smooth pudding-like trace, the mixture can clump up and turn into a stiff, grainy mass. This issue can be alarming, especially if you’re not expecting it, but the good news is that seized soap can often still be saved.
What causes seizing:
- Certain fragrance or essential oils, especially spicy or floral scents like cinnamon, clove, or lavender, can accelerate trace.
- Adding fragrance oils directly to very hot soap batter.
- Over-blending with an immersion blender after trace has already been reached.
How to prevent seizing:
- Research fragrance oils before using them—many suppliers note whether an oil is prone to accelerating trace.
- Add essential oils or fragrance oils at a lighter trace rather than waiting until it’s very thick.
- Hand-stir delicate fragrances instead of blending with a stick blender.
- Keep your working temperature in the mid-range (around 110°F) to slow down the process.
How to fix seizing if it happens:
- If the soap is only partially seized, quickly scoop the thick batter into molds and press it down firmly. The texture may be rough, but it will still harden into usable soap.
- If the soap has fully hardened, you can chop it into small chunks or grate it finely, then incorporate it into a new batch of soap.
Separation
Separation happens when your soap batter refuses to fully come together and instead splits into distinct layers of oils and lye water. You might notice a thin oily layer sitting on top of thicker soap batter, or the mixture may look grainy and uneven. Unlike soda ash or even seizing, separation means your soap never fully emulsified. If not corrected, the batch won’t set properly and may stay soft or even leak oils.
What causes separation:
- Oils and lye water were not blended long enough to fully emulsify.
- Temperatures of the oils and lye solution were too far apart, preventing a stable mixture.
- Overly high water content, which can thin the batter too much.
- Adding fragrance oils or essential oils too early, before reaching trace.
How to prevent separation:
- Always make sure your oils and lye solution are within 10 degrees of each other, ideally between 105–120°F, before mixing.
- Use an immersion blender instead of stirring by hand to achieve a solid emulsion.
- Blend until you clearly see trace—when the batter thickens enough to leave light trails on the surface.
- Add fragrance oils or essential oils only after trace has formed.
How to fix separation if it happens:
- If you notice separation while mixing, don’t panic—keep blending with the immersion blender until the mixture comes back together.
- If the soap has already been poured and separation occurs in the mold, you can scoop it back into a bowl, blend again until emulsified, and then re-pour.
- For a batch that has completely hardened with oily pockets, cut or grate the soap and rebatch it into a new mixture to save it.
Separation can be discouraging, but the good news is it’s usually fixable as long as you catch it early. Even if you need to rebatch, the soap will still cure into a solid dish soap bar with the same cleaning power for greasy dishes.
Final Thoughts
Making your own homemade dish soap recipe is a natural and zero-waste alternative to commercial dish soaps. With simple ingredients like coconut oil, castor oil, and essential oils, you can create a solid dish soap bar that keeps your kitchen sink stocked and your dishes sparkling clean.
The next time you find yourself reaching for dishwashing liquid at the grocery store, remember you can make your own dish soap at home. Not only is it budget-friendly, but it’s also a zero-waste dish soap solution that’s good for you, your kitchen, and the planet.
Homemade Dish Soap
Equipment
- Heat-safe bowls or ramekins (for soap molds)
- Heat safe bowls for mixing
- Immersion Blender
- Double boiler or stainless steel pot
- Digital scale (grams recommended)
- Safety gear: gloves, goggles, long sleeves
- Stainless steel or heat-safe mixing spoon
- Thermometer
Materials
- 620 g coconut oil
- 32 g castor oil
- 250 g water room temperature
- 110 g sodium hydroxide lye
- 20 g lemon essential oil optional
Instructions
- Prepare your containers by choosing ramekins or small bowls to use as molds for your dish soap bars.
- Place 620 g coconut oil in a double boiler and melt completely, then stir in 32 g castor oil.
- In a separate heat-safe bowl, carefully add 110 g sodium hydroxide to 250 g water (never water to lye). Stir slowly until dissolved, then set aside to cool.
- Allow both the melted oils and the lye water to cool to 105–120°F, making sure they are within 10 degrees of each other.
- Slowly pour the lye solution into the oils. Use an immersion blender to mix until the soap reaches trace, which looks like a pudding-like texture.
- Stir in 20 g lemon essential oil or other essential oils if desired.
- Pour the soap mixture into your ramekins or bowls.
- Let the soap cure in a cool, dry place for 4–6 weeks before using.


What kind of bowl do you use to mix in?
The most important rule when choosing a mixing container is to avoid aluminum—lye reacts with it. Use stainless steel, glass, or heavy-duty plastic instead. If using plastic, choose #5 (polypropylene), which is heat-safe and sturdy.
Mine turned out great but then turned a faint pink when I started using. I used lemon essential oil and cured for 6 weeks. Has this happened to yours?
Yes! That can happen sometimes, especially with lemon essential oil. Citrus oils are more sensitive and can oxidize over time, which can cause a slight color change like that faint pink you’re seeing. It doesn’t usually affect how the soap works at all.
As long as it still smells normal and there’s no weird texture or spots, it’s totally fine to keep using. I’ve seen it happen before with citrus oils, especially after the soap has been sitting or once it’s exposed to air during use.
If you ever want to avoid it, you can try using distilled water or switching to a different essential oil, but it’s mostly just a cosmetic change